


This overnight sourdough bread is the perfect recipe for beginners or experienced bakers. Simple to make and requires a long proof overnight in the refrigerator. This method gives the loaf a richer flavor and softer texture. Once you make your first loaf of sourdough, there is no going back!

This overnight sourdough bread has a special place in my heart. I have been making it since 2019 and haven't slowed down since.
I started baking with a sourdough starter before it took off in 2020. At the time there was very little information out there like today.
That led to making a ton of mistakes and making loaves that were completely inedible. So bad in fact, my chickens wouldn't touch it!
That experience with all those failures led me to this recipe and technique. Once I got it right, it stuck.
If you are like I was and struggling to learn how to make a beautiful, bakery-worthy loaf, hear me out! If I can do it, so can you. And I'm going to show you how.
Once you make your loaf of bread it will need to be eaten within a few days. Sourdough does not have a very long shelf life. Learn more about how long sourdough bread lasts.
Want to take on other sourdough baking? Check out my sourdough bagel recipe or an easy sourdough focaccia. You will be shocked how easy they are.
Jump to:
💡Why this Recipe Works
While scouring the internet and social media for the perfect bread recipe it is probably hard to determine what one to go with.
It can be intimidating, but it doesn't have to be! The cold overnight refrigerator proofing is a tried and true method and a favorite with many home sourdough bakers.
Why cold fermenting the dough works:
- Long Proof Time: When dough is proofed in the refrigerator it slows it down and allows more time for the flavor to develop. Bread that has a cold proof will have more flavor.
- Flexible Baking Schedule: The dough can sit in the fridge for 12-24 hours. I have even pushed it to 48. This gives you more time to bake that perfect loaf.
Many sourdough bakers have made this recipe with success and I'm confident you will as well! Here is what they are saying:
Lauren:
"I’m pretty new to sourdough- a few months in- and this has been my favorite recipe BY FAR. I’ve made this 4 times with consistent results. It is so easy to follow and doesn’t take a ton of “hands on” time which is important when you’re busy but still want homemade bread. Thank you!" ★★★★★
Jodie:
"I tried your recipe and hints and created my best loaf of sourdough bread ever! Let it in refrig for 23 hours. It is so tangy, great crust, lots of air holes, and yummy.
Thank you for posting your recipes and glad I found you! ★★★★★
Bonnie:
"First time making sourdough and this method and recipe was just excellent. I’m a seasoned baker but this is my first attempt with sourdough and working with a starter. If you’re new to this world, start right here! This is the best recipe!!" ★★★★★
🍞Ingredients

Active Sourdough Starter: This loaf is not possible without an active starter. Make sure it is doubling in size 6-8 hours after feeding and is bubbly and alive. Don't have a starter? Learn how to make your own sourdough starter.
All-purpose flour: This is my preferred flour to make sourdough bread. If using bread flour make sure to use the same amount in grams.
Filtered water: Try to use filtered water if possible.
Salt: Salt is what gives bread flavor! If this is left out your loaf will be inedible. I have learned this form experience.
Rice Flour: The rice flour is used in preparing your banneton basket. Using regular flour will cause the dough to stick to the sides of the basket. Rice flour is more coarse and will not absorb the moisture in the dough.
See full information on ingredients and quantities in the recipe card.
🥘Equipment
The main things you will need to make this overnight sourdough bread are:
- Digital Scale
- Glass Bowl
- Dough Whisk
- Bread Lame
- Parchment Paper
- Dutch Oven
- Cooling Rack
Read more on essential sourdough tools and equipment and what each items is used for.
⭐️Tips to Make It Better
- Use an Active Starter: Make sure your sourdough starter is alive, active and doubles in size after feeding. Learn how to tell when a sourdough starter is ready to bake with.
- Use a Digital Scale: Measuring ingredients with a digital scale is going to give you the most accurate ratios. Cups will be inconsistent and can lead to very dense bread.
- Use Wet Hands: Sourdough can be really sticky, so get your hands wet before handling it. Avoid using more flour to handle the dough.
- Work Carefully and Gently: Sourdough needs to be gently handled. This will allow those little air pockets to develop. Do not deflate those!
⏰Timeline
One thing to keep in mind is that overnight sourdough bread takes time. A lot of time. But the actual hands-on time is very minimal. While this recipe says it takes 36 hours, most of that time is just resting.
I want sourdough bread for Sunday dinner around 6:00. Here is what that looks like:
Saturday Morning:
Feed starter in the morning.
By 2:00-5:00 start mixing my dough. In the refrigerator once done.
Sunday:
Out of fridge at 2:00 and ready for final proof (or rise)
In oven no later than 4:15
Out of oven by 5:00
Sunday 6:00 Dinner
After a few loafs you will get the hang of your timeframe.
🥖How to Make
Make sure to feed your starter at least 6-8 hours prior to mixing the dough. It should double in size and be alive and active. Learn how to tell when a sourdough starter is ready to make bread.
Making the Dough
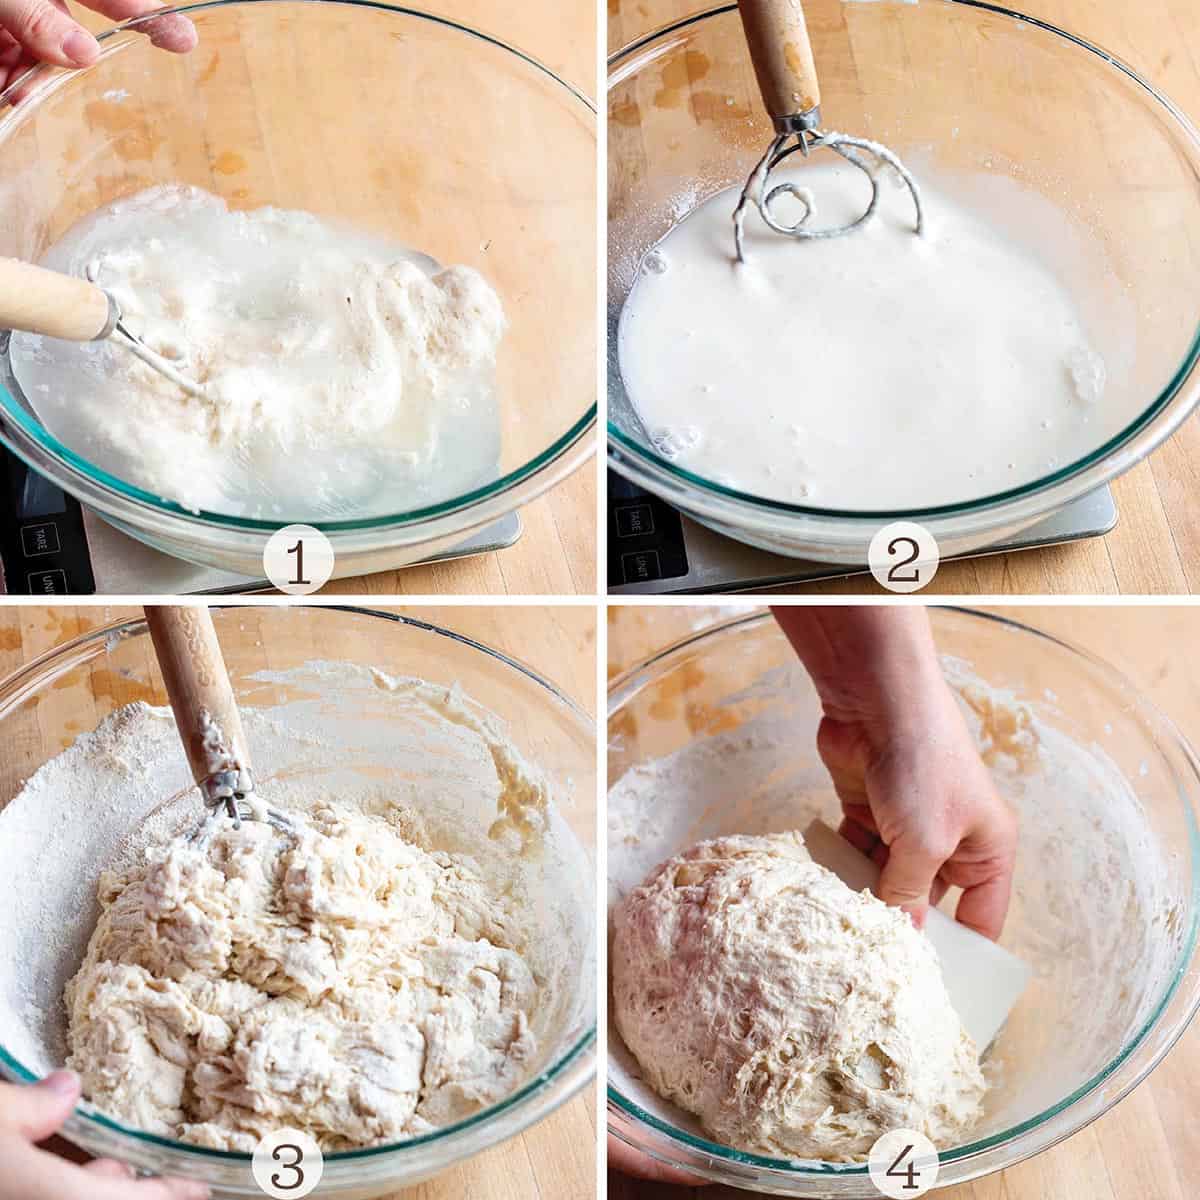
Step 1: Start off by measuring out the starter and water. Mix together with a danish dough whisk, wooden spoon or fork. (Image 1)
Step 2: Zero out the scale and add in the salt. Mix well until the entire starter and salt are fully incorporated. (Image 2).
Step 3: Zero out the scale again and add in the flour. With the dough whisk, mix the flour in until it forms a loose ball. (Image 3).
Step 4: Using your hands or a silicone bowl scraper, bring the dough together into a ball. It will be a rough texture, and thats okay! Just make sure everything is fully mixed together. (Image 4).
💡Pro Tip: Sourdough can be really sticky and hard to work with. Instead of using more flour, (which will change the consistency of the loaf) just get your hands wet before handling. It will keep the dough from sticking to your hands.
Step 5: Cover the dough with a damp towel or plastic wrap and let it rest for 1 hour on the counter.
Stretch and Folds
When making sourdough bread we do not want to knead it like other breads. Instead, perform a series of stretch and folds. This will help strengthen and develop the loaf.
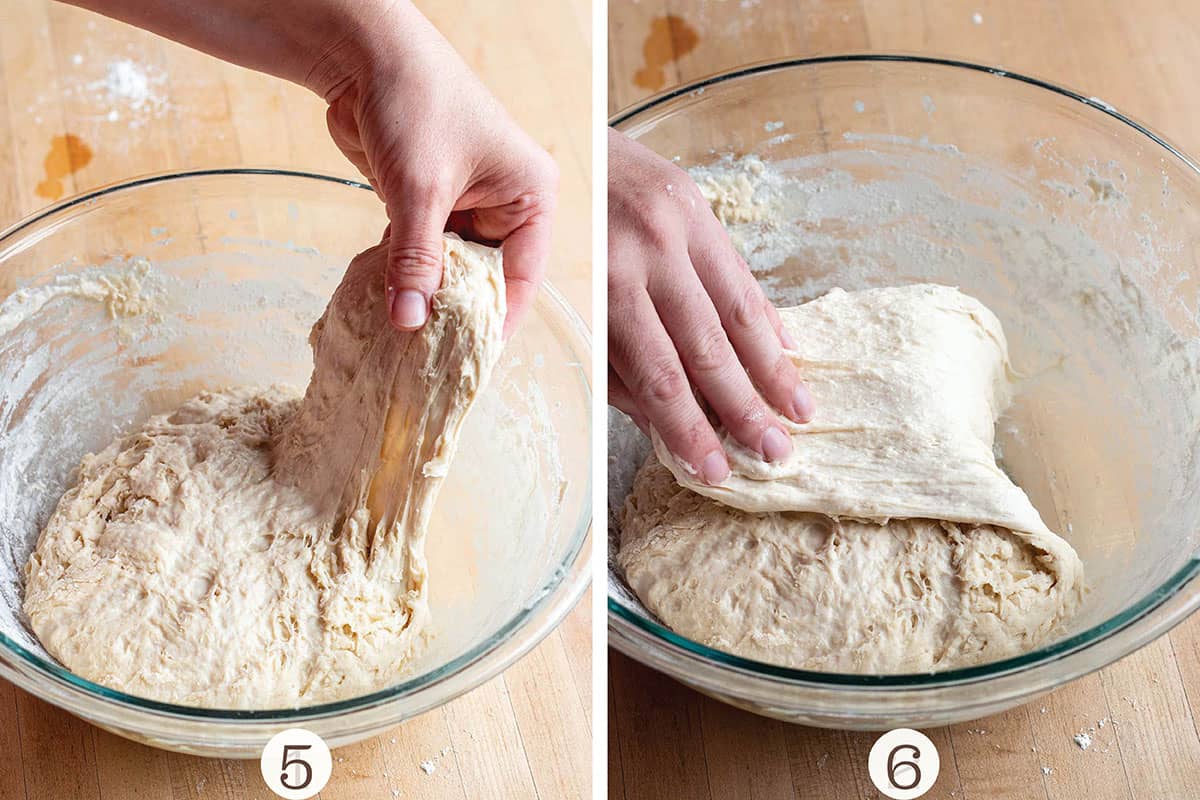
Step 6: After resting for 1 hour, perform the first set of stretch and folds. Take one side of the loaf and stretch it up as far as it can go with out breaking. (Image 5).
Step 7: Then gently fold it over to the other side (Image 6).
💡Pro Tip: Be careful not to push or work the dough. The goal is to develop those little air pockets and overworking it will deflate it.
Step 8: Repeat this process on all four sides. Cover and let rest another hour.
Step 9: Continue this for another 2 hours. At the end you should have done a total of 3 start and folds. The dough should look soft, relaxed and smooth. If it still rough let it sit one more hour and do a 4th set.
Step 10: After the last set of stretch and folds, cover the bowl with plastic wrap and place in the refrigerator for 12-24 hours. This is called the bulk proofing.
While this is called an overnight sourdough bread the key takeaway is that it needs to proof in the refrigerator for at least 12 hours. You can really bake it anytime the next day.
Shaping
Important Tip: At this stage the dough has been developing and growing those little air pockets. It is very important that we handle it gently and try to not deflate it. Work soft and gently during the shaping process.
Step 11: Before shaping the dough be sure to season your banneton basket. Sprinkle a layer of rice flour and shake it in the basket so it is completely coated. This will prevent the dough from sticking.
Step 12: After the dough has had time to proof in the refrigerator and you are ready to bake, remove the dough and carefully turn it out on a non floured work surface.
Step 13: Very carefully, lift the sides up and stretch the dough out into a square or rectangle.
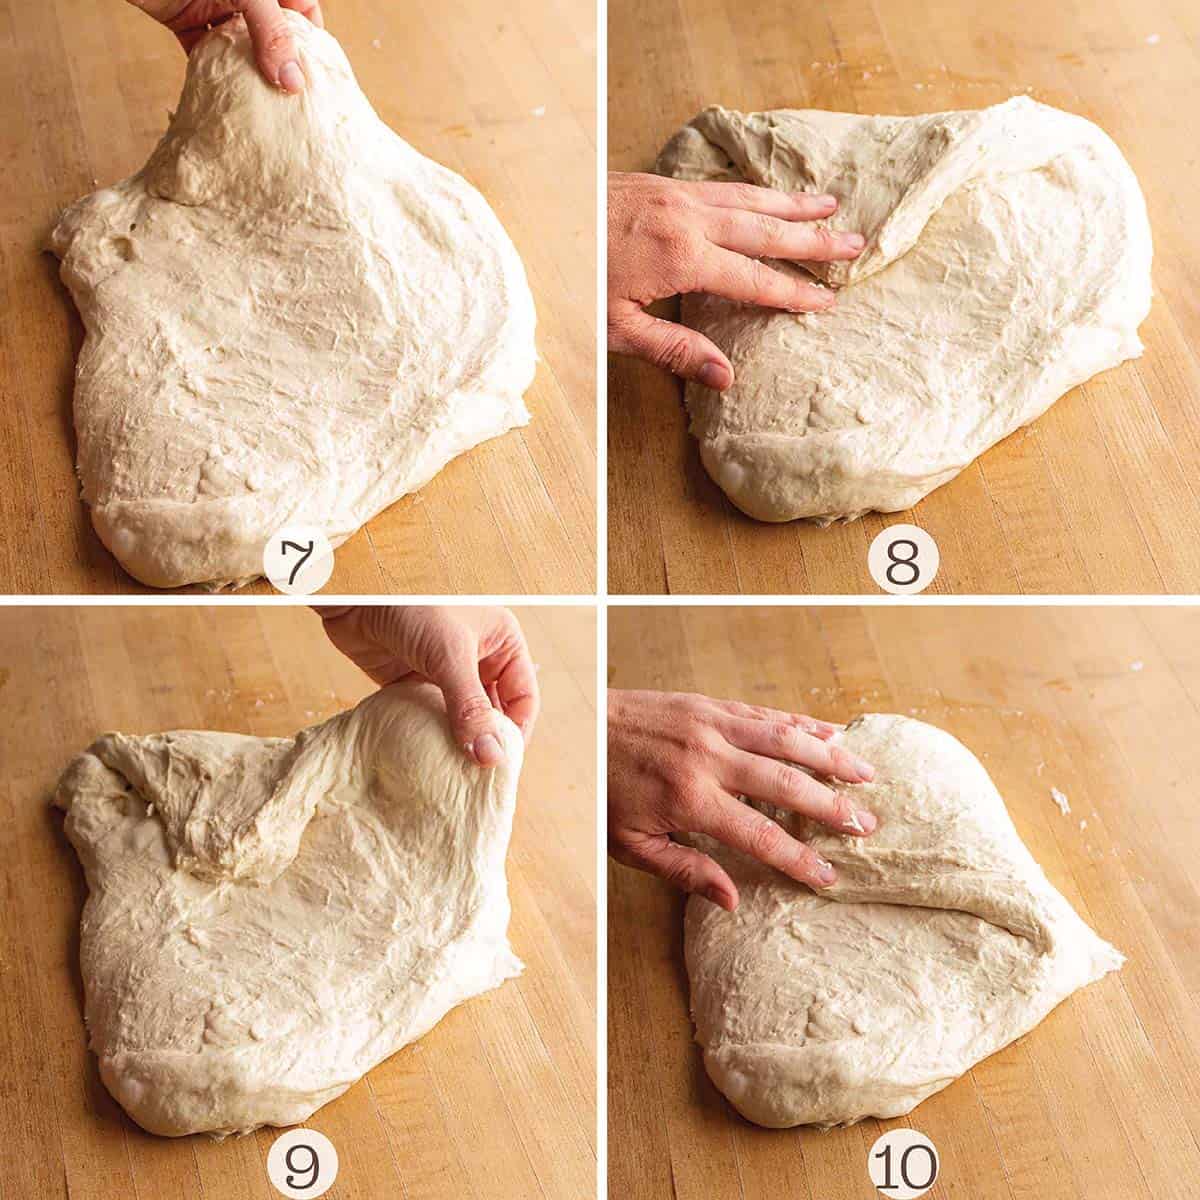
Step 14: Gently lift one side of the dough and fold it to the middle. (Image 7 & 8).
💡Pro Tip: If the dough is sticking to the counter use a bench scraper to help release it. Do not try and pull it off.
Step 15: Repeat this process for all the sides. (Image 9 & 10).
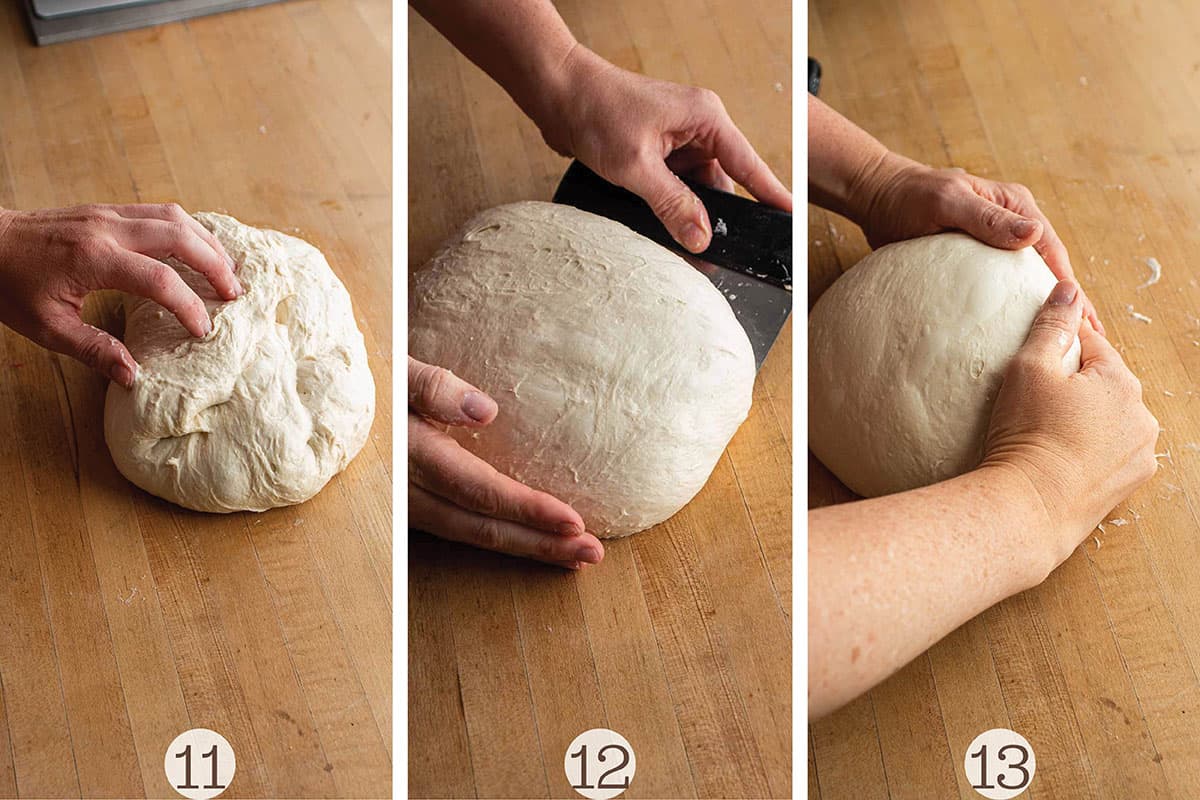
Step 16: Fold the last side over creating a loose ball. (Image 11).
Step 17: Using a bench scraper flip the loaf over seam side down (Image 12).
Step 18: Using your hands, gently pull the bread along the surface. The friction will close up the seam and create a taught ball of dough. (Image 13).
Step 19: Place seam side up in a prepared banneton and cover with a light towel and allow to rest up to two hours.
Baking
Step 20: 30 minutes before you are ready to bake, start preheating the oven. Warm it up to 500 degrees Fahrenheit with the Dutch Oven inside.
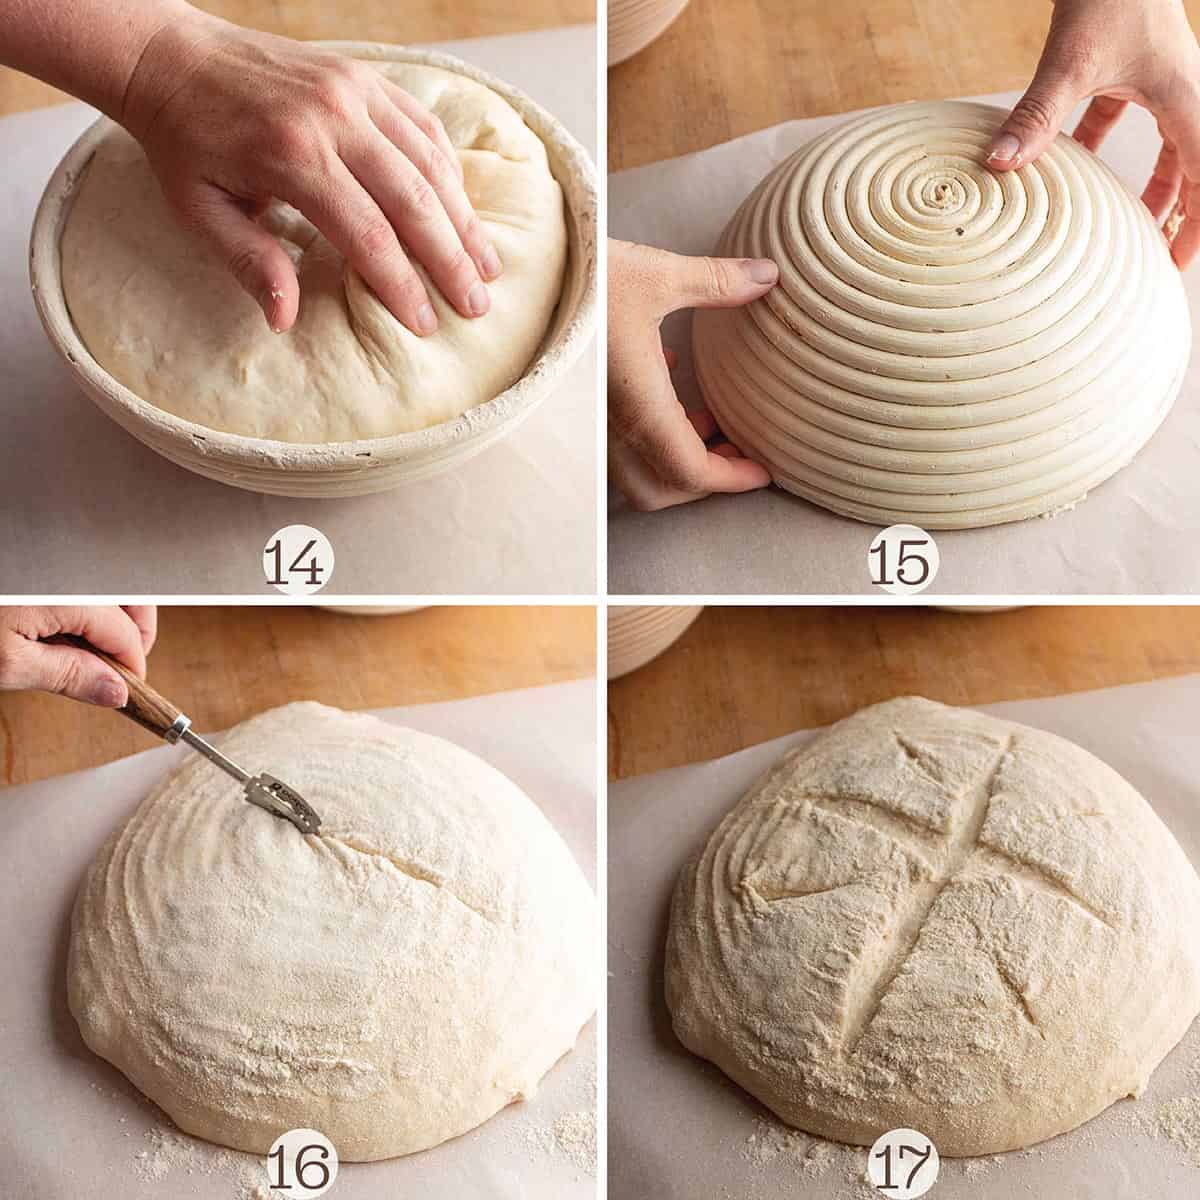
Step 21: Once the oven is preheated and dough is ready, carefully pull away the sides of the dough from the banneton. This just ensures it isn't stuck. (Image 14).
Step 22: Flip the banneton over onto a piece of parchment. (Image 15).
Step 23: Score a pattern into the loaf with a bread lame or other razor. A knife will not work that great. (Image 16 & 17)
Step 24: Reduce the temp to 450 degrees Fahrenheit and then carefully remove the lid of the Dutch Oven. Lift the bread with the parchment paper and place inside. Put the lid back on and bake for 25 minutes.
Step 25: After the 25 minutes, remove the lid and bake another 25 minutes. The bread is done when the internal temp reaches 205-215 degrees. I like to take it out at 210 degrees.
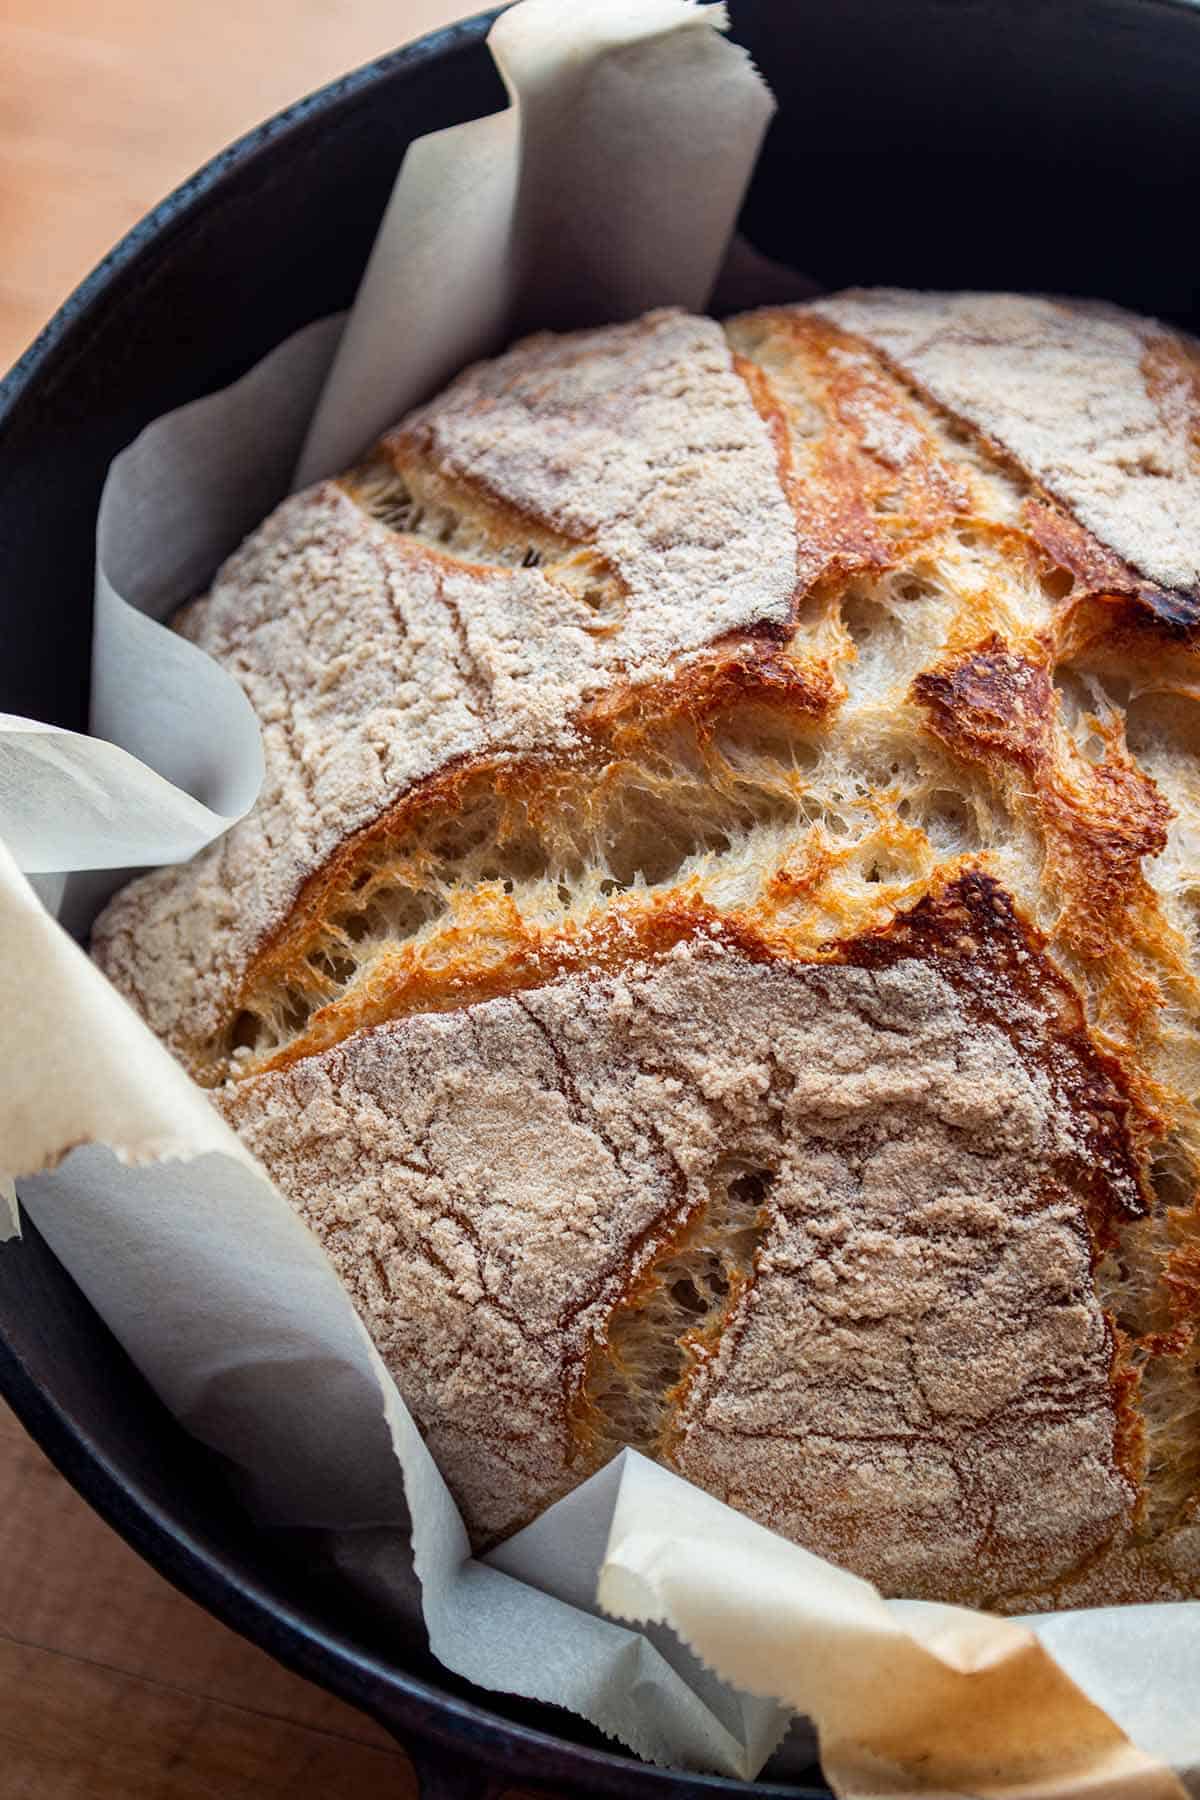
Step 26: Very carefully lift the bread out of the Dutch Oven by the parchment paper and place it on a wire cooling rack. If left in the pot, the bottom of the bread may burn.
💡Pro Tip: If you can, wait 1 hour before slicing. With the internal temperature at 210 the bread is still cooking. If cut too soon, all the moisture and heat will escape and it may give you a gummy texture. If your into that texture, then go for it!
And thats it! You have a beautiful loaf of artisan sourdough bread. Smother it in butter or dunk in a bowl of soup.
❓Recipe FAQs
Yes! In fact allowing dough to rise overnight or for extended time will give you even more flavor. Just cover the bowl with plastic wrap and place in the refrigerator. If left on the counter for a longer period it will become over proofed. A cold proof will slow it down.
Yes! If left in the refrigerator to proof it can sit for 24 hours. If left on the counter for that long it will become over-proofed.
Sourdough does not need to sit overnight, however it does require 8 or more hours to proof.
Other Sourdough Recipes:
You must use the category name, not a URL, in the category field.Did you make it? If you loved this recipe or any others on Dirt & Dough, please leave a 5-🌟 in the recipe card below. Let me know how it went by leaving a comment below the recipe card. I love hearing from you!
*Let's Connect! Follow along on Instagram, Pinterest or subscribe to receive emails!
📋Recipe

Overnight Sourdough Bread
Equipment
Ingredients
- 175 grams Sourdough Starter - Learn how to make your own
- 360 grams Filtered Water
- 9 grams Salt
- 550 grams All-Purpose Flour
- Brown Rice Flour - For banneton basket
Instructions
Feed the Starter
- Feed your starter 6-8 hours prior to making bread. Make sure it's at peak performace, meaning it has doubled in size and has lots of bubbles.
Mixing the Dough
- Start by placing a glass bowl on a digital scale. Make sure it is measruing in grams and zeroed out.
- Add in the active sourdough starter.
- Zero out the scale again and pour in the filtered water. Zero the scale.
- Add in the Salt. Zero out the scale.
- Mix well with a fork until fully combined and zero out the scale.
- Add in the flour.
- With a dough whisk or fork, mix everything until it starts to come together and forms a rough dough.
- Using your hands, form the dough into a rough ball.
- Cover with plastic wrap, or wet towel, and set aside for 1 hour.
Stretch and Folds
- Over the next three hours you will do a series of stretch and folds at the end of each hour (3 total). To do this gentely pick up one side of the dough, stretching it out as far as it can without breaking and gently folding it over. Repeat on the three other sides.
- At the end of the first hour, remove plastic wrap and do first round of stretch and folds. Cover and rest another hour
- After hour two, remove plastic wrap and stretch & fold all four corners again. Cover back up and rest.
- After hour three, remove plastic wrap and stretch & fold all four corners again. Cover back up.
- After the third round of stretch & folds it's time to let the dough sit overnight. Transfer the bowl to the refrigerator where it will sit 12-48 hours.
Shaping and Final Proof
- Once you are ready to bake, remove the bowl from the refrigerator and turn your dough on to a solid surface (not floured).
- Prepare the banneton, or tea towl linned bowl with brown rice flour. (see notes about what flours to use).
- Shape the dough. Gently streatch out all the corners of the dough. Be careful not to deflate any of the air pockets.
- Take each corner and gently fold to the middle, again avoid kneading and deflating the air pockets.
- Repeat on all four corners until it resembles a rough ball.
- Turn the dough, seam side down, and with your hands, gently slide the dough across an un-floured surface a few times. The friction will cause the seam to come together without overworking it. Use a bench scraper if necessary.
- Place dough in the basket, seam side up. Cover and rest for a total of two hours.
Baking
- 30 minutes before baking, preheat your oven 500 degrees Fahrenheit with your dutch oven inside. We want the dutch oven nice and hot before adding our dough.
- Remove your dough onto a piece of parchement paper so now it is seam side down. What you should have is a round, somooth top.
- Score your dough with a razor or bread lame.
- Lower the oven temperature to 450 degrees.
- Careyfully lower the parchment paper into the scalding hot dutch oven. Put the lid on and bake for 25 min.
- After that time, remove the lid and bake for another 25 minuties.
- Your bread is done when the internal temp. reaches 205-215 degrees Fahrenheit. 210 is the sweet spot.
- Wait about 1 hour before cutting into the bread. It is still baking during this time and if cut too soon, it could lead to a gummy texture.
Notes
- Making sourdough bread takes some practice. If it doesn't turn out your first time don't give up. It is a very different process than typical loaves of bread and a lot of different factors can lead to a loaf not turning out.
- Sourdough is a very wet, tacky dough. Don't be surprised if it sticks to everything. We want to avoid adding more flour to the dough. This can cause the new flour to get clumpy and not incorporate well. Instead, try these things:
- Get your hands damp (not too wet) right before handling the dough.
- Work Fast
- Use a bench scraper
- The dough will undergo a long, cold-proof in the refrigerator. This will make sure the bread does not proof too quickly. The cold temps slow down this process and give the dough more time to develop more flavors.
- Do not use a proof setting on an oven. Most ovens that have a preset-proof option are a minimum of 100 degrees. That is just too hot. So double-check what your proofing temp is on your particular oven prior to using the setting. You want the final proof of your bread around 75-80 degrees.
- Use brown rice flour for the basket. The rice flour will not absorb the moisture in the bread. Regular flour will make it stick.
- Dutch Oven: We bake sourdough in a dutch oven because this particular dough requires steam to rise. When the cold dough is put in a hot dutch oven the moisture from the dough gets trapped inside. This helps give it that beautiful oven spring. Then, by removing the lid halfway through it gives the loaf a chance to develop that crispy crust.
- Make sure your dutch oven can withstand temps of 500 degrees
- Be extra careful when handling. They get extremely hot!
- Scoring Bread. We want the inside of our bread to release the moisture and we help it by scoring the crust. Not only does it give your final product a fun and artsy look but it also helps the bread get that nice oven spring. There is no hard and fast rule here. Have fun. Get creative!
- Do not use a knife. They are not sharp enough
- Use a sharp razor blade or bread lame.
- Rest: This is the hardest part of baking your bread. You just spent all these hours caring for your loaf just to look at it for the next hour. While you could dive right in I encourage you to wait an hour. The bread is extremely hot (205 degrees) and cutting too soon can disrupt the final cooking process and can lead to a more gummy texture.


This was my first go at sourdough, and success! I've been in an unofficial sourdough immersion program for a few weeks (read: have fallen down a YouTube and r/Sourdough hole 🥖🕳️😵💫) while I waited patiently for my starter to have that big, beautiful burst of energy I kept seeing online, and yesterday was the day, so I went for it (with high hopes and low expectations 😂).
A combination of a couple of mistakes toward the end and having none of the tools that help to create a pretty loaf made for an exterior that's... well, let's just say when I pulled it out of the oven, I was sure it was DOA. But the inside? Hole-y, soft, chewy, flavorful perfection! I've read again and again that you shouldn't expect your first loaf of sourdough to disappoint. I even saw an introduction to a recipe on KA's website that says essentially, "Newbies, for the love of all that's holy, *please* don't try this recipe; go here (link to sourdough recipe with yeast added) instead." I'm just tickled pink. Thank you!