


Norwegian Potato Lefse is a staple served during the holidays in Norwegian families. This delicate paper thin flat bead made of potatoes and flour is typically served with butter and sugar. While time consuming and tedious, homemade lefse is hands down better than anything you can find. Want to learn how to make lefse and pass on the family tradition? You came to the right place.
If you are reading this, chances are you are from a Norwegian family and lefse (pronounced lefsa) is something you had every single year for Thanksgiving, Christmas, or Easter. No one searches lefse out of the blue.
Is this a tradition you want to continue or resurrect? Need help learning how to make this difficult holiday favorite? I can help! Better yet, join my Let's Make Lefse Facebook group and get tips and tricks from other lefse lovers.
I have been in your shoes. My grandma was the one making lefse for years, and it's my turn to take on this family tradition.
So here I am, diving in and learning all I can to keep the lefse tradition going in our family and now I want to pass on all I have learned to keep it going in other Norwegian families as well!
My grandma always says you only learn to make lefse by doing it, and she's right.
Lefse takes time, patience, practice, and even more practice. And since there is no single way to make lefse, you get to make it your own. And with my tips and tricks it will be easier than you think.
Jump to:
⭐️Tips for Making Lefse
Regardless of the recipe or technique you follow, here are some crucial tips I have found to be helpful over the years.
- Rice the Potatoes. This is a must. Lefse requires the creamiest potatoes without a lump in sight. No one likes lumpy potatoes, especially in the lefse. Do yourself a favor and get a good potato ricer.
- Use Very Little Flour. Flour, while necessary, when you use too much, it can cause the lefse to be way too thick. This takes a lot of practice. When starting out you may need to use a lot more flour, and then over time you'll learn to work with the potatoes using less and less.
- Make sure the potato mix is cold before rolling. Cold potatoes roll a lot better than at room temperature. Chill them overnight in logs or balls so that we are only working with a few at a time. That way the rest of the potatoes can stay in the refrigerator until you are ready to use them.
- Make sure the griddle is hot. Lefse needs to cook quickly so having a hot grill is crucial.
- Only cook the first side for about a minute. This is a recent trick I learned and it worked so well. Let your first side cook only for a minute, then flip. Let the second side cook longer and develop those brown spots.
- Do not re-roll. If the lefse tears or rips, it's better to just grill as it is. When it gets balled up and re-rolled it will just be too thick.
- Roll in a gliding movement not pushing down: Pushing down on the rolling pin will only cause it to rip. Use more of a gliding movement.
- You will only learn with practice. There will be lots of ugly lefse, lefse with holes, ripped in half and pieces of dough stuck everywhere. Just know this is normal and part of the process. This one is worth repeating!
🥔Ingredients

The recipe I am going to show you is my version. Typically family recipes have been passed down through generations. So if you have your own, please use that instead. The steps will be the same.
Russet Potatoes: This is the most common way to make lefse. Red potatoes will not give you the same consistency. Another great option would be instant potatoes. Instant potatoes is also great if you do not have a ricer.
All-purpose flour: This is the best flour to use. Any other type will give you different texture.
See full information on ingredients and quantities in the recipe card.
🔪Equipment Needed
This is a list of what you will need to make lefse. If you want to do it right, and make it easier on yourself, invest in these things that you will use over and over and pass on to the next generation.
- Lefse Griddle: A true lefse griddle is the only way to make it. I have tried just a cast iron pan on the stove and it just did not work the same. I highly suggest investing in this equipment.
- Lefse Turning Stick
- Pastry Board: This board comes with a pastry cloth that is ideal for rolling lefse.
- Potato Ricer: Do not skip the ricer. The potatoes just will not turn out right without it.
- Lefse Grooved Rolling Pin: This pin is specially designed to roll out lefse.
- Flour sack towels or tea towels
- If you are just starting out and don't have any of the essential equipment above, there are sets on Amazon that have everything you will need.
👩🍳How to Make Lefse:
I am going to start by saying if this is your first time, please give yourself grace.
Lefse is learned only by doing and practicing, so don't expect to get it your first shot. If you do, congratulations!
Prepare the Potatoes:
The night before you want to make lefse, prepare the potatoes.
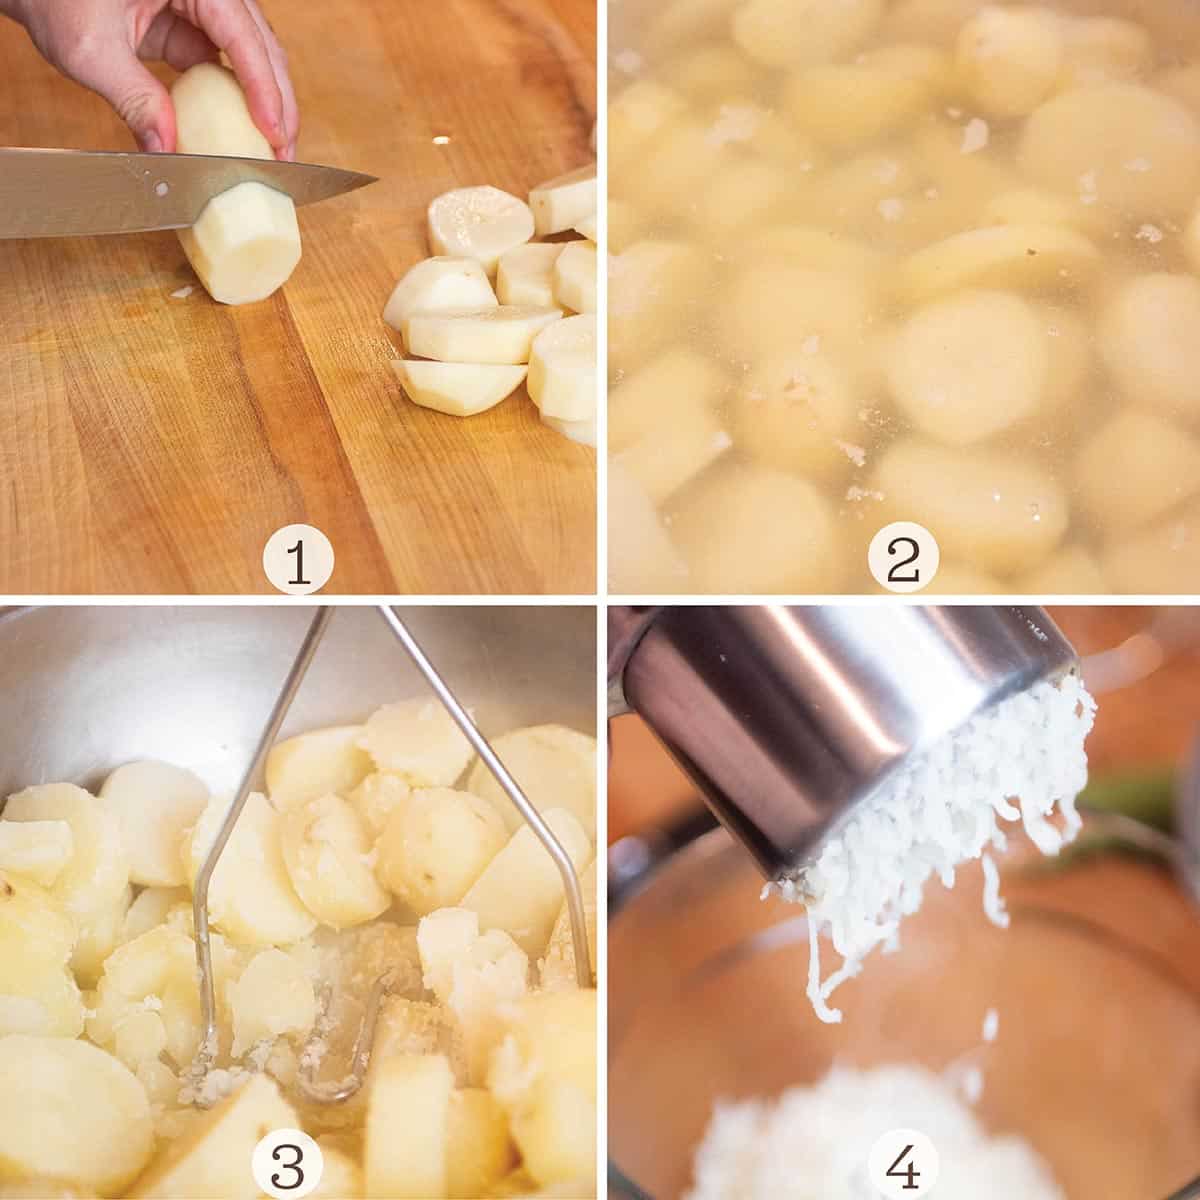
Step 1: Start off by peeling the potatoes and dicing them into 1" slices. (Image 1).
Step 2: Add the potatoes to a large pot and cover with water. Make sure the water level is 2" above the potatoes. Stir in the salt and bring the pot to a boil. (Image 2).
Continue to boil the potatoes until they are tender and easily fall apart with a fork.
Step 3: Drain the water and let the potatoes dry. Then place the potatoes in a large bowl. Take a masher and gently mash until they are broken up into small pieces. (Image 3).
Step 4: IMPORTANT! DO NOT SKIP THIS STEP: Using a potato ricer, press all the potatoes until they are smooth with no lumps. (Image 4).
Do it twice if needed. Lefse will not roll properly if there are any lumps.
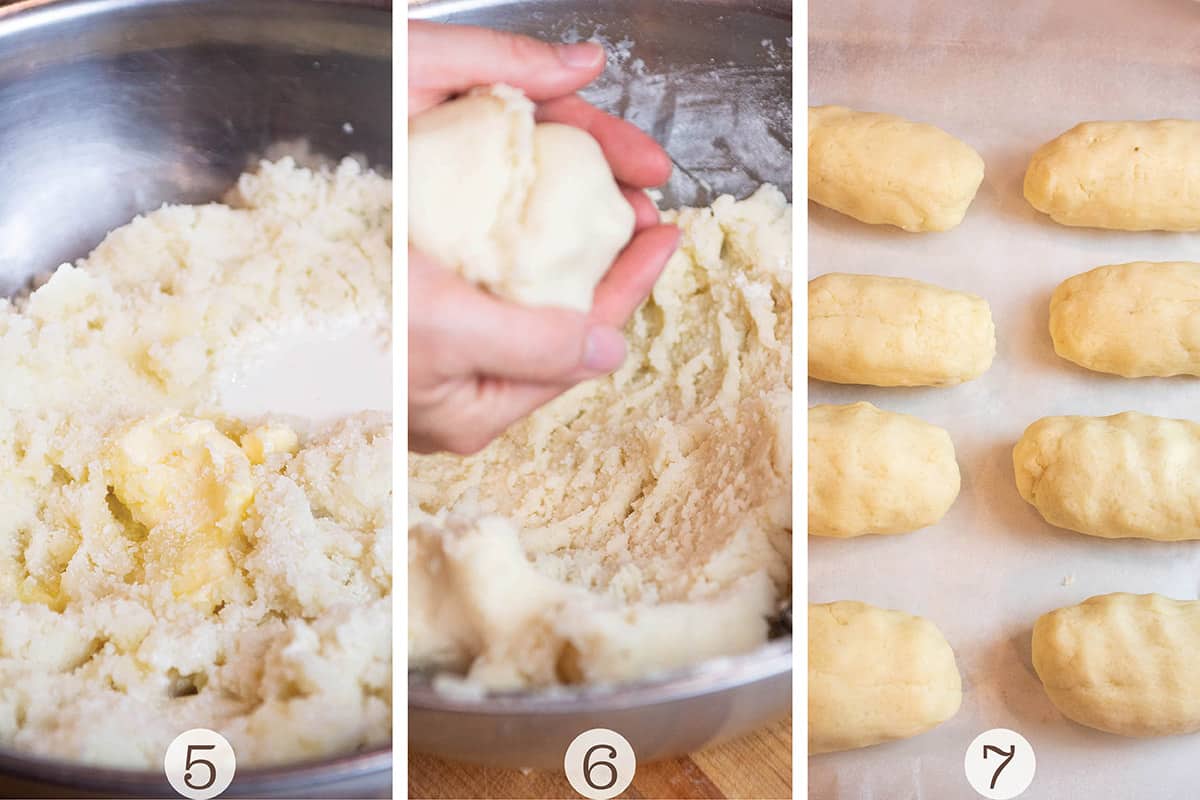
Step 5: In a large bowl, mix together the soft butter, potatoes, salt, and cream until it is all completely mixed. (Image 5). It should look and taste like mashed potatoes.
Step 6: Then, add in 2 cups of flour and mix. The dough will start to form and will be thicker. (Image 6).
💡Pro Tip: I do not add too much flour in this step. I save the flour for the rolling process. Again too much flour will make the lefse thick.
Step 7: Take a baking sheet and line it with parchment paper. Then take about 1 cup of the potato mixture and form them into logs. (Image 7). It will be about the size of a whole russet potato.
Step 8: Place the potato logs on the parchment, cover them with plastic wrap, and place them in the refrigerator overnight.
💡Pro Tip: I chill them in a dough ball or logs, because when we go to roll the lefse out, we just work with one log at a time, keeping all the others chilled. It also makes it easier to cut.
Prepare your Workspace
Before you make lefse, it's so important that you have a good workspace all set up.
It will get messy, fast, so having everything where it needs to be will only set you up for success.
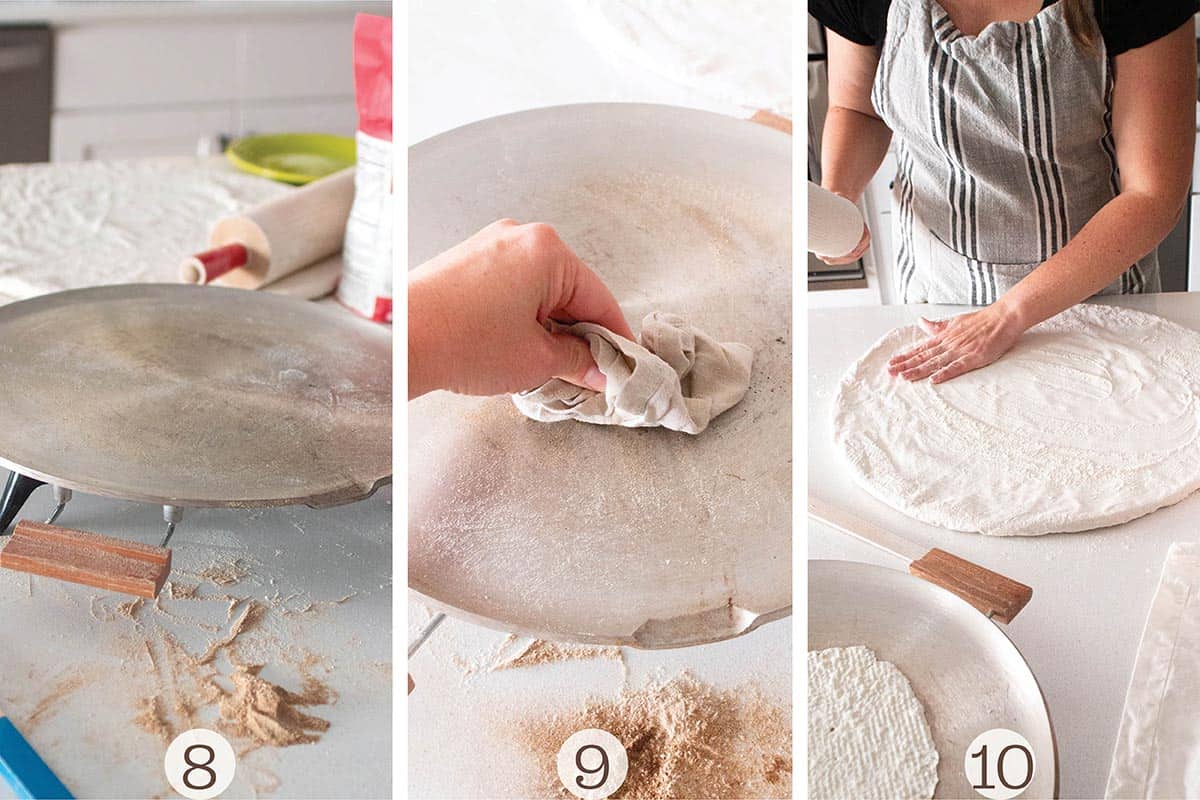
Step 9: Clear the counter and have your grill, rolling mat, turning stick, flour, a dry cloth and a space with towels where they will be cooling. Have your griddle and rolling board close to make transferring easier. (Image 8)
💡Pro Tip: I like to use a dry wash cloth to remove all the excess flour off my griddle. A clean paint brush is also a great option. (Image 9).
Step 10: Generously flour your pastry board and rolling pin. Add some more flour. And then more. (Image 10)
This may seem excessive but those first few will be very sticky and you want all your equipment to be completely floured.
Rolling
Rolling lefse is an art that takes practice. Lot's of practice. I cannot stress this enough.
Step 11: Warm up the lefse grill to 450-500 degrees Fahrenheit or medium-high heat. Allow it to completely warm up before grilling your first one. I find 450 is the sweet spot for my griddle.
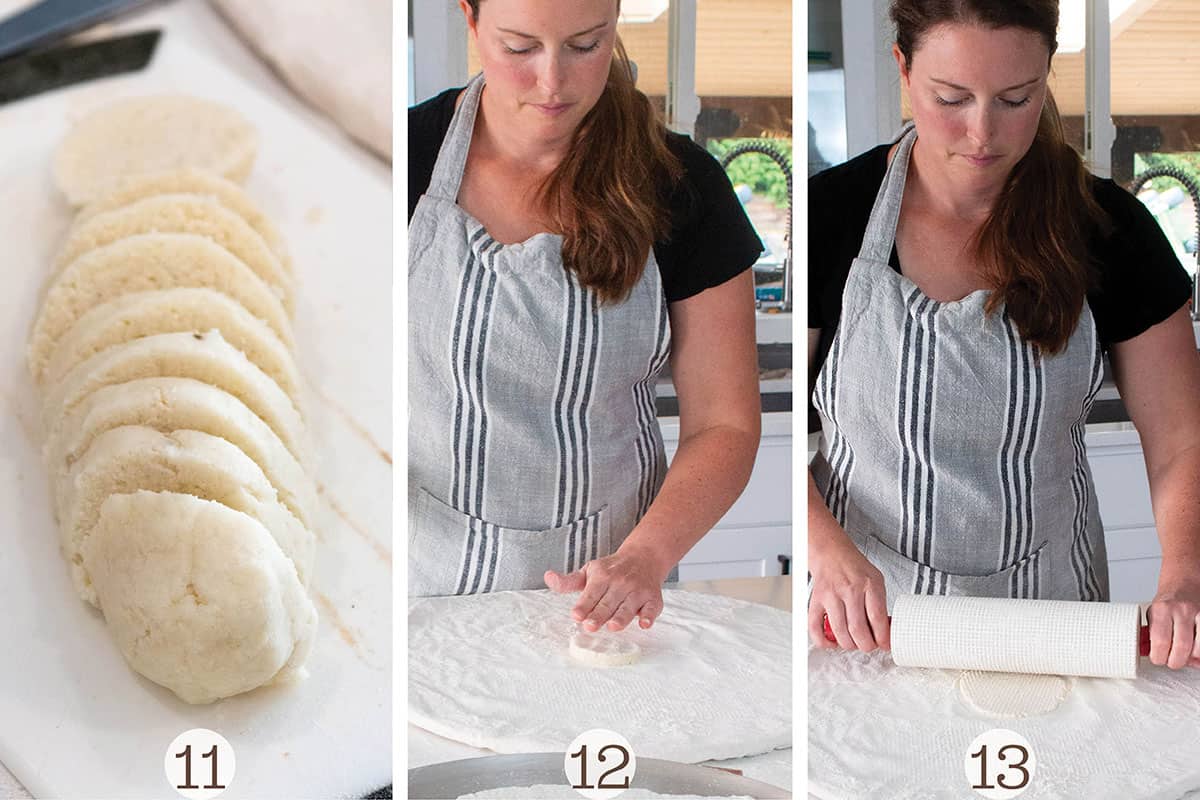
Step 12: Take one of the dough logs and cut it into pieces. The size is really up to you. (Image 11).
💡Pro Tip: If you have never rolled lefse, I would highly suggest starting small and slowly making them bigger. Small lefse rounds are easier to transfer to the griddle.
Step 13: Take your first piece and gently dab each side in the flour. (Image 12).
Step 14: Now gently roll the piece in a couple of directions. (Image 13).
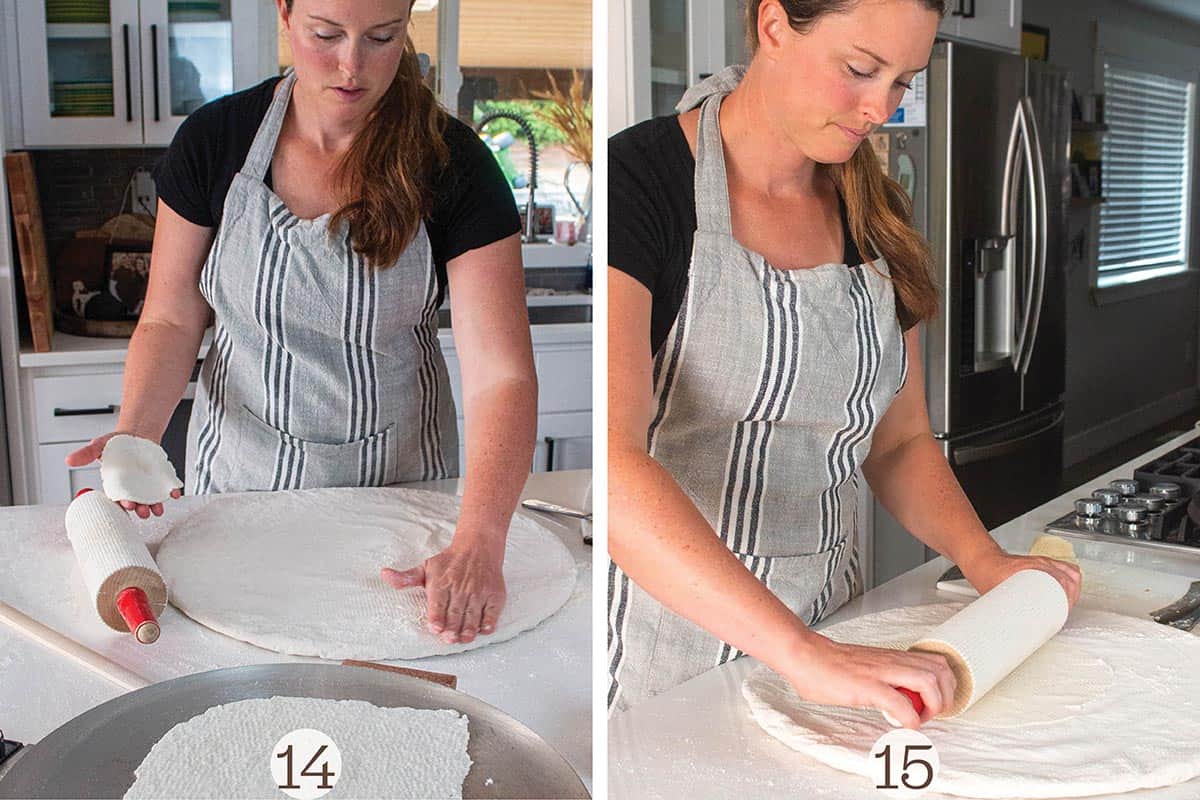
Step 15: While it is still really thick, pick it up move more flour over and flip it over. (Image 14).
This will coat both sides with flour and reduce the chances of it sticking to the roller. While flipping, make sure there is still a good amount of flour under the lefse. Since adding this step, my lefse has never stuck! It works so well.
Step 16: Continue rolling in multiple directions until it is paper thin. You will see in the photo how relaxed my hands are. This is a very gentle movement. (Image 15).
💡Pro Tip: The rolling pin gets moved in almost a gliding movement, not pushing down. Pushing down on the pin will cause it to stick to the cloth, rolling pin and then cause it to tear. It is more of a pushing and pulling movement.
More tips for rolling:
- If any dough gets stuck on the cloth or in your rolling pin, stop immediately and scrape it off right away. A butter knife works great to scrape it off.
- If your lefse does starts to tear or rip DO NOT RE ROLL! It is better to grill as it is with the holes. If you ball it back together and re roll, it will be too thick.
- Don't be afraid to reapply flour often. I always make sure there is plenty before each time I roll.
Grilling
Now that the lefse is rolled out it's time to transfer to the griddle.
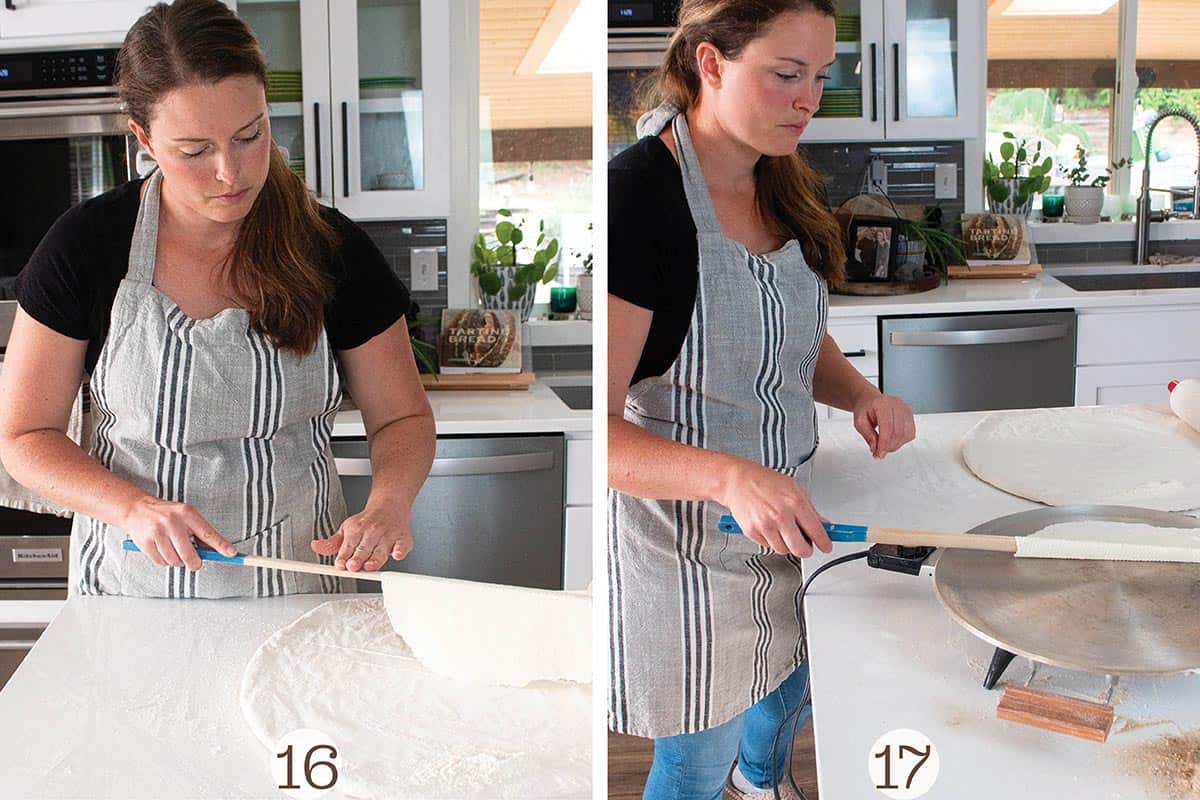
Step 17: Using a lefse stick, carefully slide it under the middle of your round. You want the flat side of the stick to glide along the pastry board. (Image 16).
Step 18: Gently pick it up and roll it out onto the grill. (Image 17).
If it starts to tear or get holes, that's okay. it's better to be grilled that way. Remember, by re-rolling it will just cause the lefse to become too thick.
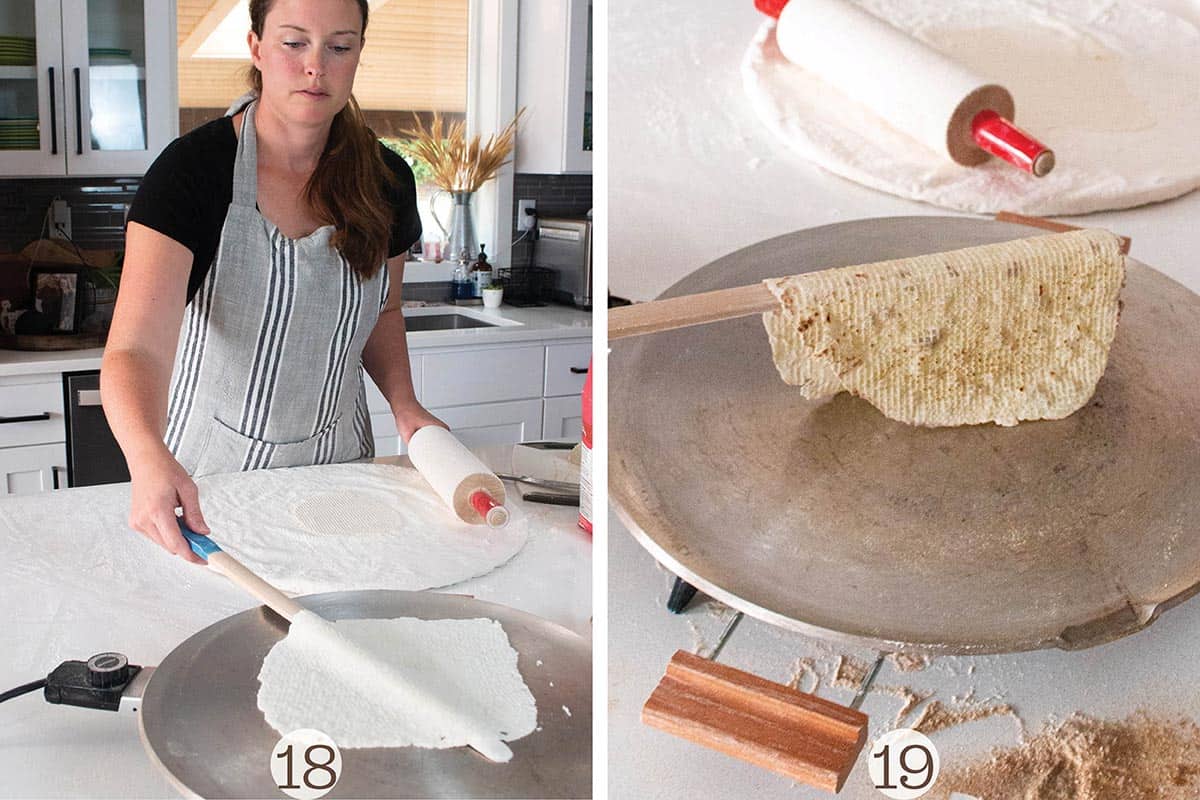
Step 19: Once on the grill, allow the first side to cook for about a minute or until it starts to get golden brown. Take the lefse stick again and glide under the middle, lift and flip. (Image 18)
Step 20: Grill the other side a bit longer and allow the brown spots to form. (Image 19).
Step 21: Remove lefse from the griddle and place on one half of a flour sack towel or tea towel. Lay each piece on top of each other and cover with the other side of the towel. This will keep the moisture in while they cool. If left out they can become crusty.
❄️How to Store
Only store in the refrigerator once they have completely cooled.
Once cool, they can be folded into fourths and placed in a ziplock bag in the refrigerator for 4-5 days. After that it will start to dry out.
Does lefse freeze well? Yes! It freezes really well! Fold in 4ths like above, keep in stacks of about 4-6, wrap in plastic wrap and then keep in a ziplock bag. That way you can just remove smaller portions at a time for serving.
🧈How to Serve
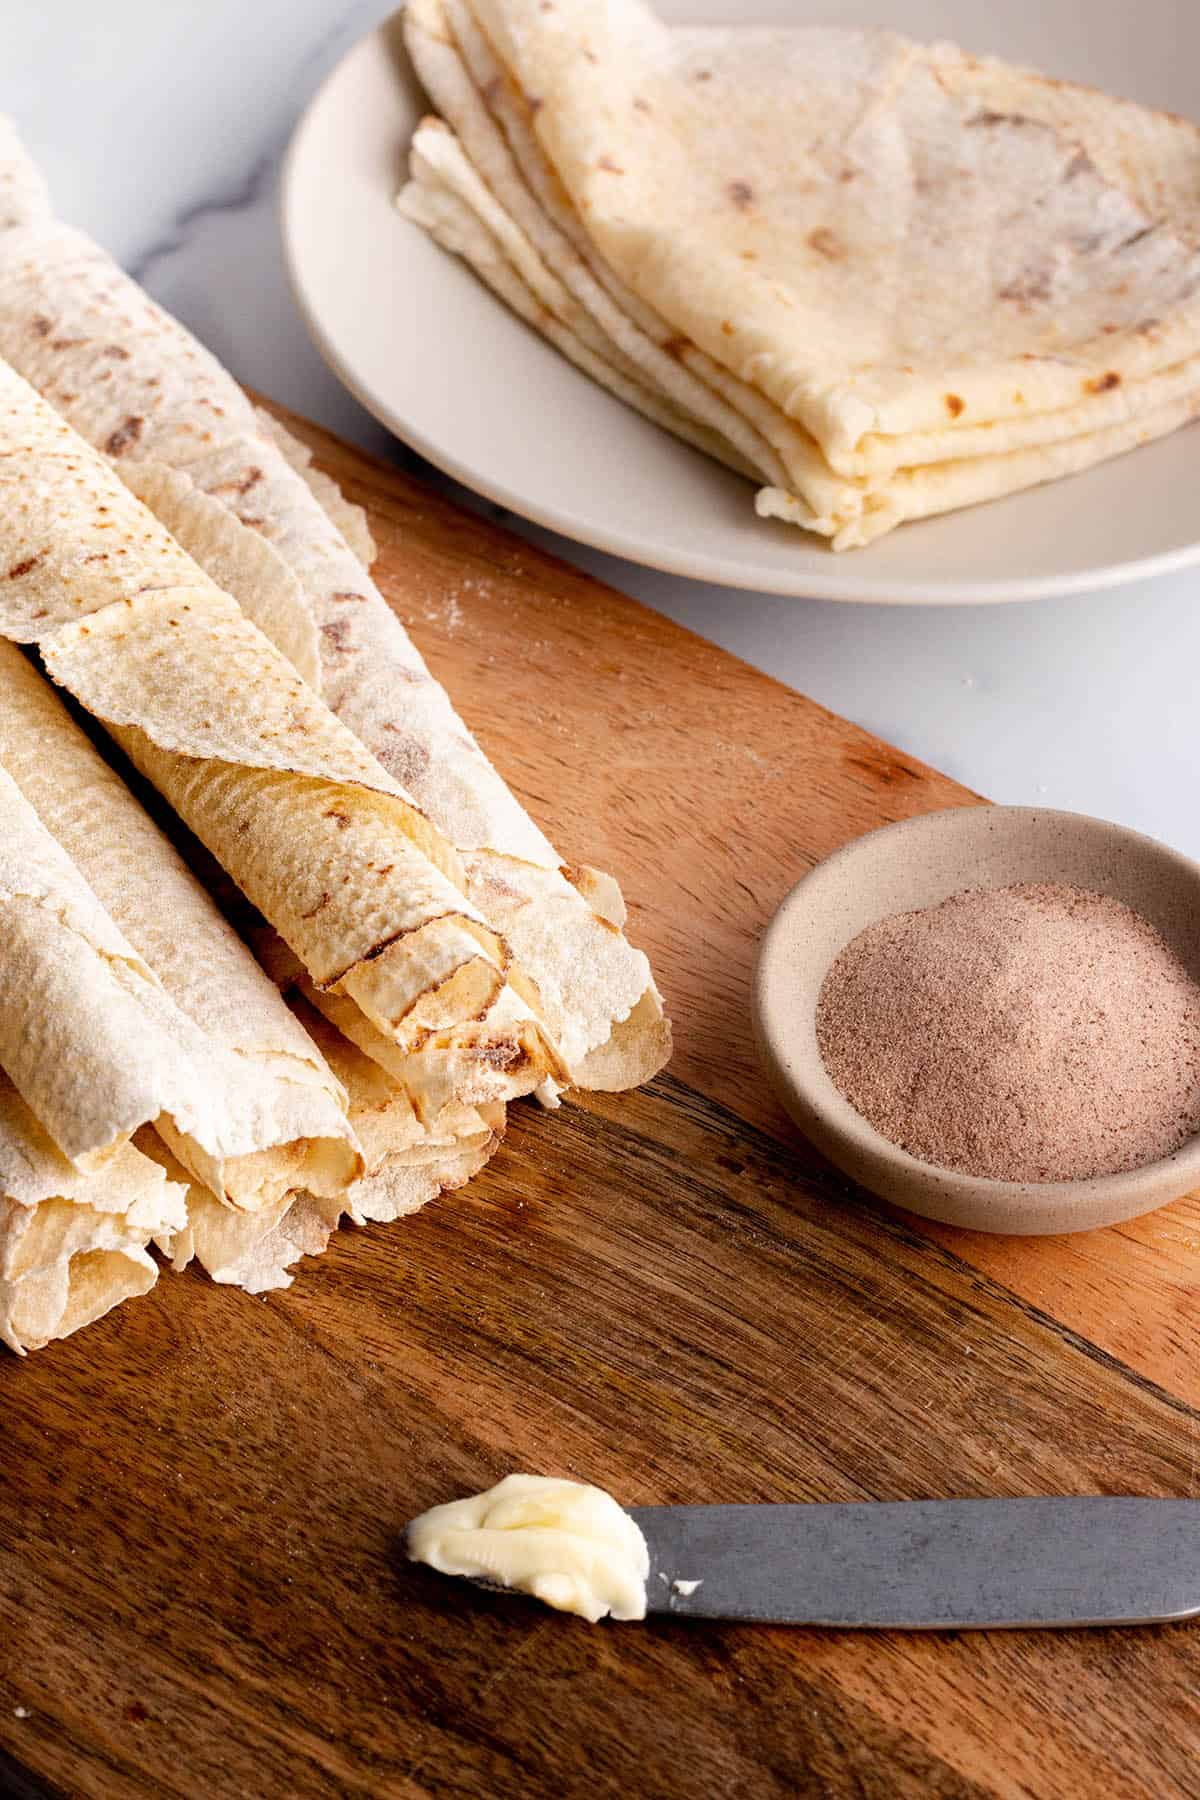
Lefse is traditionally served rolled up with soft butter and cinnamon sugar.
You can also use jam, Nutella or your other favorite spreads.
It does not need to be warmed back up and can be enjoyed cold or at room temperature.
❓Recipe FAQs
Lefse is very different from a tortilla and is more like a flat bread. It is made with mostly mashed potatoes and has added cream and butter.
Lefse is usually served with soft butter and then sprinkled with sugar or cinnamon sugar. It can also be served with jam, Nutella or other spreads.
Lefse can be enjoyed warm or cold. It is best right off the griddle but can also be enjoyed right out of the refrigerator.
🦃Other Holiday Recipes


Did you make it? If you loved this recipe or any others on Dirt & Dough, please leave a 5-🌟 in the recipe card below. Let me know how it went by leaving a comment below the recipe card. I love hearing from you!
*Want to learn even more about lefse and get all your questions answered? Join my Let's Make Lefse Facebook group thats full of very skilled lefse makers.
📋Recipe

Norwegian Potato Lefse
Equipment
- Parchement Paper
- Flour sack or tea bowl for cooling
Ingredients
- 5 pounds Russet Potatoes, peeled washed and diced into 1" slices. - Will be about 8-10 cups rice potatoes. See instructions.
- ½ Cup Unsalted Butter - Softened
- ¼ Cup Heavy Whipping Cream
- 1 teaspoon Salt
- 2 Cups Flour - Plus more for rolling, See notes
Instructions
Prepare the Potatoes
- The night before you want to make lefse, prepare the potatoes.
- Start off by peeling the potatoes and dicing them into 1" slices.
- Add the potatoes to a large pot and cover with water. Make sure the water level is 2" above the potatoes. Stir in the salt and bring the pot to a boil. Continue to boil the potatoes until they are tender and easily fall apart with a fork.
- Drain the water and let the potatoes dry. Then place the potatoes in a large bowl. Take a masher and gently mash until they are broken up into small pieces.
- IMPORTANT! DO NOT SKIP THIS STEP: Using a potato ricer, press all the potatoes until they are smooth with zero lumps. Lumpy lefse will not roll.
- In a large bowl, mix together the soft butter, mashed potatoes, salt, and cream until it is all completely mixed. It should look and taste like mashed potatoes.
- Then, add in 2 cups of flour and mix. The dough will start to form and will be thicker.
- The next thing you will want to do is take a cookie sheet and line it with parchment paper. Then, take about 1 cup of the potato mixture and form them into logs. They will be the size, and look like a russet potato.
- Place the potato logs on the parchment, cover them with plastic wrap, and place them in the refrigerator overnight.
Prep Work Station
- Before you make lefse, it's so important that you have a good workspace all set up. Clear the counter and have your grill, rolling mat, turning stick, flour, a dry cloth and a space with towels where they will be cooling. Have your griddle and rolling board close to make transferring easier.
- Generously flour your pastry board and rolling pin. Add some more flour. And then more.
Rolling Lefse
- Warm up the lefse grill to 450-500 degrees Fahrenheit or medium-high heat. Allow it to completely warm up before grilling your first one. I find 450 is the sweet spot for my griddle
- Take one of the dough logs and cut it into pieces. The size is really up to you and how big you want your rounds to be. I typically get 7-9 slices per log.
- Take your first piece and gently dab each side in the flour.
- Now gently roll the piece in a couple of directions with the rolling pin.
- While it is still really thick, flip it over. This will coat both sides with flour and reduce the chances of it sticking to the roller. While flipping, make sure there is still a good amount of flour under the lefse. Since I started doing this not one has stuck to the board.
- Continue rolling in multiple directions until it is paper thin. Use more of a gliding movement and do not push down too hard.
- If any dough gets stuck on the cloth or in your rolling pin, stop immediately and scrape it off right away. Use a butter knife to scrape any dough off and reapply more flour.
- If your lefse does starts to tear or rip DO NOT RE ROLL! It is better to grill as it is with the holes. If you ball it back together and re roll, it will be too thick.
- Reapply flour to your workspace and rolling pin often.
Grilling Lefse
- When the lefse is nice and thin transfer to the griddle. Using a lefse stick, carefully slide it under the middle of your round. You want the flat side of the stick to glide along the pastry board.
- Pick it up and roll it out onto the grill. This takes practice.
- Once on the grill, allow the first side to cook for about a minute or until it starts to get golden brown.
- Take the lefse stick again and glide under the middle, lift and roll out on the other side.
- Grill the other side a bit longer and allow the brown spots to form.
- Remove lefse from the griddle and place on one half of a flour sack towel or tea towel. Lay each piece on top of each other and cover with the other side of the towel. This will keep the moisture in while they cool. If left out they can become crusty.
- Either enjoy right away or allow to completely cool before storing in the refrigerator.
Notes
-
- Rice the Potatoes. This is a must. Lefse requires the creamiest potatoes without a lump in sight. No one likes lumpy potatoes, especially in the lefse. Do yourself a favor and get a good potato ricer.
- Use Very Little Flour. Flour, while necessary, when you use too much, it can cause the lefse to be way too thick. This takes a lot of practice. When starting out you may need to use a lot more flour, and then over time you'll learn to work with the potatoes using less and less.
- Make sure the potato mix is cold before rolling. Cold potatoes roll a lot better than at room temperature. Chill them overnight in logs or balls so that we are only working with a few at a time. That way the rest of the potatoes can stay in the refrigerator until you are ready to use them.
- Make sure the griddle is hot. Lefse needs to cook quickly so having a hot grill is crucial.
- Only cook the first side for about a minute. This is a recent trick I learned and it worked so well. Let your first side cook only for a minute, then flip. Let the second side cook longer and develop those brown spots.
- Do not re-roll. If the lefse tears or rips, it's better to just grill as it is. When it gets balled up and re-rolled it will just be too thick.
- Roll in a gliding movement not pushing down: Pushing down on the rolling pin will only cause it to rip. Use more of a gliding movement.
- You will only learn with practice. There will be lots of ugly lefse, lefse with holes, ripped in half and pieces of dough stuck everywhere. Just know this is normal and part of the process. This one is worth repeating!


1/2 of a 5 lb bag or 5 lb bag russets? Recipe confusing
My first time making lefse by myself (my husband's 95 year old mom made it with me for the first time last month). Following your tips and very good directions, this actually went way smoother and it was just me this time. Rolling into logs, working with one log at at time, and flipping each piece while it was still thick were game changers. I also only made about 6-8 inch rounds which kept it easier to flip. I tore holes in a few pieces but resisted the urge to re-roll the pieces and they turned out great. Thanks so much. This is definitely my go-to lefse recipe!
Hi Robin! Thank you so much for your kind review. I am so happy it went so well for you and you loved this recipe!